Fencing is an often overlooked opportunity to beautify a home and upgrade curb appeal. A fresh coat of stain or paint can vamp up your home and provide essential protection to keep fencing in good condition over the years. These products can prevent wood fences from rotting, helping them last for years.
Painting or staining a fence requires specific skills, various supplies and significant time and energy. With Rent Painters, you can enjoy fast, professional fence painting services. You only need to pick your paint or stain, and we’ll handle the rest!
But if you’re considering tackling this home update on your own, this handy guide explains how to paint a fence.
Selecting the Perfect Paint and Tools for Your Fence
If you have wood fencing around your home, you can choose between paint and stain. While paint will offer a dramatic new appearance, a stain can embrace the wood’s natural look by darkening it. Staining will preserve the natural grain of the wood.
High-quality exterior paint works well on wood surfaces. You’ll also need an all-purpose primer to ready the surface for the paint. If you opt for wood stain, it’s a good idea to use an oil-based sealant. This sealant penetrates deeper into the wood than water-based sealants, providing a stronger coating. However, you shouldn’t need a primer.
In addition to these products, the tools needed to paint a fence include brushes or rollers. The right tools will depend on the type of fencing. If you have picket fencing, 4- to 6-inch brushes are best because they give you more control.
In contrast, rollers can help paint the larger surface area of garden fencing quickly. They also ensure an even coat for larger surface areas. However, you may still need to use brushes to paint or stain the edges.
Preparing Your Fence for Painting or Staining
It’s important to prepare the surface before you paint or stain your fence. The following steps help create a smooth base layer that paint can adhere to:
- Inspect the fence: Check the fence to ensure it’s structurally sound. Repair or replace damaged areas as needed.
- Remove existing paint: If the fence has an existing coat of paint, use a paint stripper to remove the coat. Apply the stripping product and wait for it to start lifting the paint, then use a brush to scrub the paint away. Work in small sections to remove all traces of the paint coat. Once you have revealed a bare surface, grab a garden hose or pressure washer to rinse the fence and remove any leftover paint stripper.
- Clean the fence: If your fence does not have an existing coat of paint, start by cleaning the surface with a brush and a gentle detergent. Remove all dirt and grime before moving on to the next step.
- Sand the wood: Use a sander to smooth the wood and create an even surface. It’s best to work in small sections. The surface needs to be free of splinters and flaws. You can sand with the grain for smooth results or use a diagonal motion to cover large areas faster.
- Prime the surface: If you plan to use paint, apply a thin, even layer of primer to cover the entire surface area of the fence. If you have picket fencing, be sure to apply primer along the edges of each picket. If you plan to use stain, you can skip this step.
The Painting Process
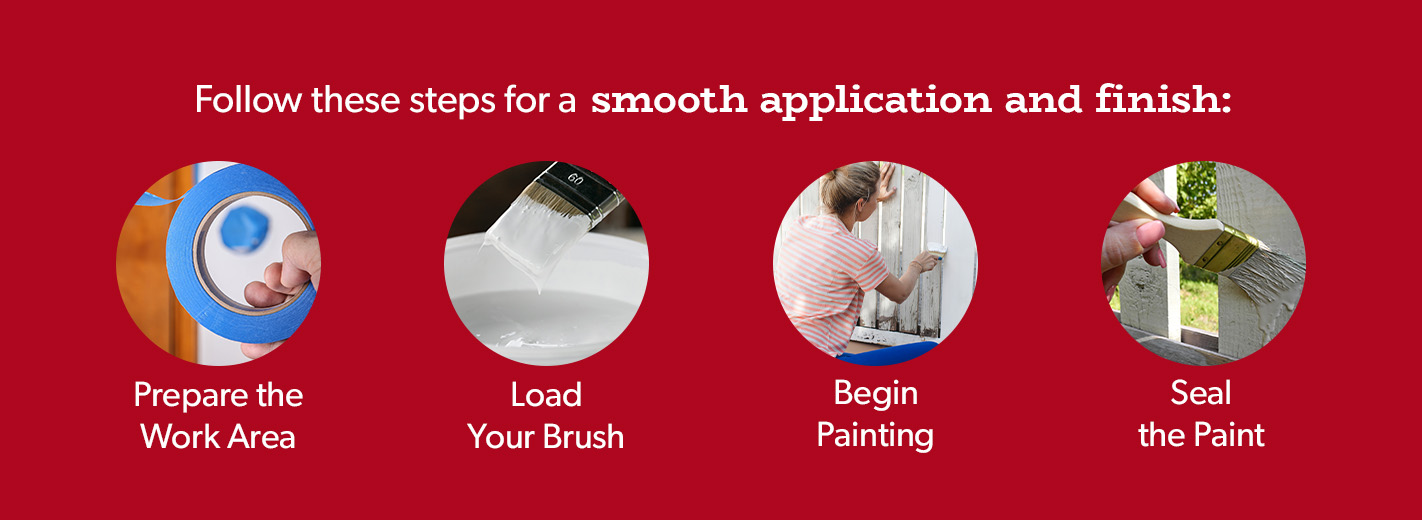
Once you have a smooth, even surface, the painting or staining process can begin. Follow these steps for a smooth application and finish:
1. Prepare the Work Area
Start by taping areas you want to avoid painting — like the gate hinges and lock feature — with painter’s tape. Cover the ground with plastic sheeting to keep paint off your lawn.
2. Load Your Brush
Fill your painting tray one-third of the way with paint or stain, then dip your brush or roller to get started. If you are using a brush, load it with a small amount of paint — loading the brush with too much paint can cause dripping and uneven results. Similarly, when using a roller, it’s important to load it with minimal paint rather than saturating it and risking drip lines.
3. Begin Painting
Paint the horizontal trim first, using a horizontal motion to work with the natural grain. Then, move on to the fencing and paint vertical strokes to keep following the wood’s grain direction.
Whether painting your fence or coating it with stain, you will use the same motions. If you are using paint, apply a second coat after leaving the first coat to dry for about three hours. Wood stain will also need two coats and between 24 and 48 hours of drying between coats.
4. Seal the Paint
Most paint products require between 24 and 48 hours of drying time following the second coat, while wood stain usually takes 24 to 72 hours to dry thoroughly. Once the paint or stain is completely dry, you can apply a sealant to the paint if desired. You can use a water- or oil-based product, but oil-based sealants tend to be better for wood fences.
If using stain, remember to apply a protective oil-based sealant. You can apply the sealant with clean brushes using the same painting motions.
Understanding Weather Conditions for Optimal Painting Results
Weather conditions can impact drying times. The best weather to paint a fence is between 40 and 90 degrees Fahrenheit with low humidity levels. Check weather reports to ensure there’s no chance of rain interrupting drying times for at least two days after painting or staining your fence.
The best weather to stain a fence is similar. However, you should avoid applying the stain in direct sunlight, as this can cause streaks and lap marks.
DIY vs. Hiring Professionals
Giving your wood fencing a paint or stain makeover can take substantial preparation and time. While the initial prep work can take several hours, accommodating drying times takes even longer.
Professional painters can tackle these jobs much faster. With the right tools and experience, prepping wood surfaces can be a quicker task. Moreover, you won’t need to monitor drying times or worry about uneven results.
DIY projects often seem like the more affordable choice. However, when considering the costs of supplies and the time it takes to create ideal results, entrusting professional services can be a cost-efficient solution to enjoy the benefits of painting your fence without the hassle.

Let Rent Painters Update Your Home’s Fence
Painting or staining a fence is a labor-intensive project. Between gathering the right tools, preparing, priming and painting, it can take a while to update your home’s fencing.
Rent Painters has over a decade of experience in the art of residential fence painting and staining. We understand the uncertainty that can come with budgeting for home improvement projects. That’s why we offer transparent pricing to ensure our clients have a clear idea of these costs early on.
Our team of experienced artisans works efficiently to ensure fast, high-quality results. Contact us today to update your home’s fence with a fresh coat of paint or stain!